1. :before 和 :after 的主要作用是在元素内容前后加上指定内容,示例:
HTML代码:
<p>你好</p>
CSS代码:
p:before{
   content: 'Hello';
   color: red;
}
p:after{
    content: 'Tom';
    color: red;
}
效果:

以上代码是:before和:after的基本用法,但是这两种伪类还有很多更方便的用法。
2. :after清除浮动
元素设置浮动以后,其父元素以及父元素的兄弟元素的布局都会受到影响,如父元素的背景边框不能正常显示,父元素的兄弟元素位置布局错误等,
为了避免这种浮动带来的影响必须要清除浮动,:after就是其中的一种方法。
CSS代码:
ul:after{
    content: '';
    display: block;
    width: 0;
    height: 0;
    clear: both;
}
3. :before和:after 用来写小三角形
在日常的工作中会经常遇到小三角形这样的小图标,可以用添加图片的方式实现,但是更方便的是用:after :before伪类来实现。
HTML代码:
<div class="demo">这是一个测试</div>
CSS代码:
.demo:after{
    content: '';
    display: inline-block;
    width: 0;
    height: 0;
    border: 8px solid transparent;
    border-left: 8px solid #AFABAB;
    position: relative;
    top: 2px;
    left: 10px;
}
效果:
![]()
这样就可以在文字后面添加一个小三角形啦,是不是很方便
4. 用:after和:before 写一个对话框
HTML代码:
<div class="left">
  <p>吃了吗</p>
</div>
<div class="right">
  <p>吃过了,吃了红烧排骨和酸菜鱼</p>
</div>
CSS代码:
.left,.right{
    min-height: 40px;
    position: relative;
    display: table;
    text-align: center;
    border-radius: 7px;
    background-color: #9EEA6A;
}
.right{      /*使左右的对话框分开*/
    top: 40px;
    left: 60px;
}
.left > p,.right > p{    /*使内容居中*/
    display: table-cell;
    vertical-align: middle;
    padding: 0 10px;
}
.left:before,.right:after{   /*用伪类写出小三角形*/
    content: '';
    display: block;
    width: 0;
    height: 0;
    border: 8px solid transparent;
    position: absolute;
    top: 11px;
}
/*分别给左右两边的小三角形定位*/
.left:before{
    border-right: 8px solid #9EEA6A;
    left: -16px;
}
.right:after{
    border-left: 8px solid #9EEA6A;
    right: -16px;
}
效果:

上面的对话框是模仿微信的样式写的,用:before和:after写很方便哦
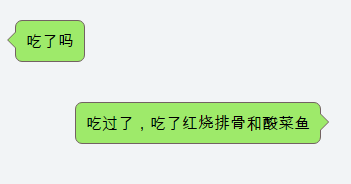
5. 下面写一个带边框的对话框,一个对话会同时用到:before和:after
HTML代码:
<div class="left">
  <p>吃了吗</p>
</div>
<div class="right">
  <p>吃过了,吃了红烧排骨和酸菜鱼</p>
</div>
CSS代码:
.left,.right{
    min-height: 40px;
    position: relative;
    display: table;
    text-align: center;
    border-radius: 7px;
    background-color: #9EEA6A;
    border: 1px solid #736262;
}
.right{      /*使左右的对话框分开*/
    top: 40px;
    left: 60px;
}
.left > p,.right > p{    /*使内容居中*/
    display: table-cell;
    vertical-align: middle;
    padding: 0 10px;
}
.left:before,.right:after,.left:after,.right:before{   /*用伪类写出小三角形*/
    content: '';
    display: block;
    width: 0;
    height: 0;
    border: 8px solid transparent;
    position: absolute;
    top: 11px;
}
/*分别给左右两边的小三角形定位*/
.left:before{
    border-right: 8px solid #9EEA6A;
    left: -16px;
}
.left:after{      /*左边对话框小三角形的边框样式*/
    border-right: 8px solid #736262;
    left: -17px;
    z-index: -1;
}
.right:after{
    border-left: 8px solid #9EEA6A;
    right: -16px;
}
.right:before{    /*右边对话框小三角形的边框样式*/
    border-left: 8px solid #736262;
    right: -17px;
    z-index: -1;
}
效果:


